Let’s be honest, sometimes your Apple ID may feel like an old email address you used in middle school; outdated or hard to remember. And when that happens? You might want to do something about it.
Maybe you are switching emails or just worried about security. Whatever your reason is, changing your Apple account on your iPhone is way easier than it seems. You just need to know the right steps to follow. The best part? You won’t lose your photos, apps, or anything important.
Things to know before changing your Apple ID
Before we even jump to the actual steps, there are a few things you need to keep in mind when it comes to changing your Apple account. First is to understand that your Apple ID is more than just a login; it’s also the key to all your Apple services.
These credentials connect your app store, FaceTime App Store, among other apps. So, take the precautions below not to lose anything during the switch:
- Back up your stuff — photos, notes, and anything you may need later.
- Have an ongoing subscription with family members? Ensure they are aware that you will be switching your Apple account.
- After you sign out on your iPhone, double-check the other devices where you’ve used that email. Make sure you’re signed out everywhere.
Doing all these saves you a lot of hassle and makes switching over way easier.
Step-by-step guide to changing Apple ID on iPhone
Follow these 4 simple steps, and changing your Apple ID will be a breeze:
Log out of your current Apple account
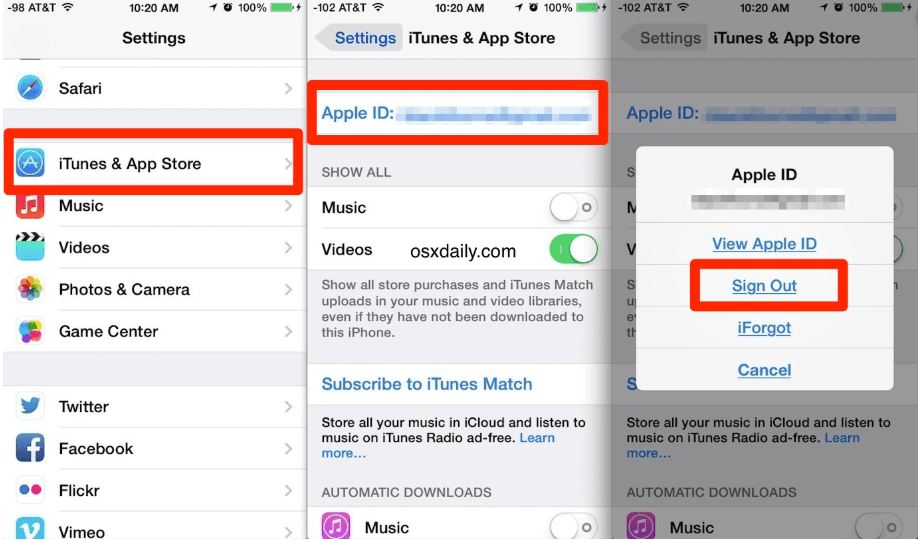
- Click to open the settings app, and tap on your name at the top to access the Apple ID settings.
- Scroll down and tap ‘Sign Out.’ You will be prompted to enter your current Apple ID password.
- Tap ‘Turn off.’ Then, choose which data you would like to retain in your phone. Keep a copy of every detail that matters (e.g., contacts and events on your calendar).
At times, signing out takes more time than expected; this may be due to the amount of data in your iCloud.
Create a new Apple ID
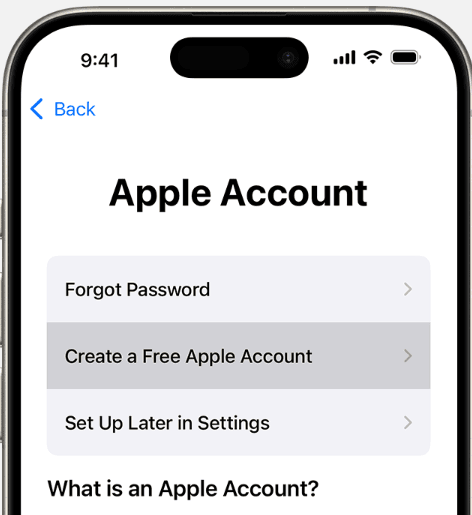
If you have already set your new email, you can skip to step 3. But, if you haven’t, there are two ways to create a new account. One is via their official website. The other way is via your phone, using the steps below:
- Open your settings app, opt for Sign In, and pick “Create Apple account.”
- Follow the steps, choose an email you actually use. When you set your password, make it strong. Mix in some capital letters and symbols. And for the security questions? Don’t pick stuff your friends or family could easily guess, but make sure you will remember the answers.
- Check your email account for a verification code sent by Apple.
Sign in with your new Apple ID
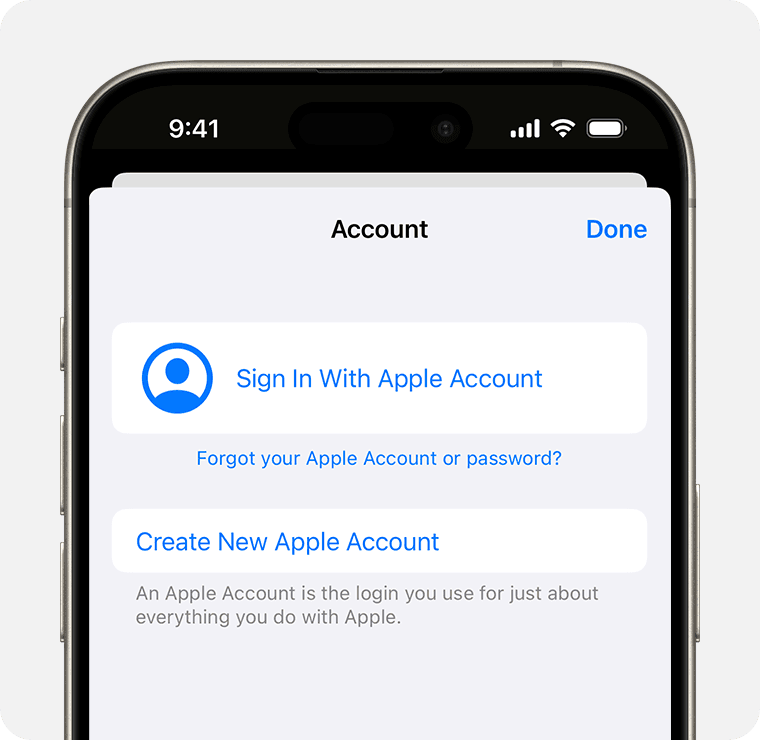
- Head over to the settings app again, and sign in to your iPhone.
- Enter the new Apple ID and password.
- You may be asked to merge your existing iPhone data with iCloud if you have anything on your phone. You can choose not to, but we recommend combining the data to keep everything safe.
Check all Apple services
- Once you confirm that you are signed in, take a quick look at all other devices to check whether the photos, contacts, and notes are syncing. Be sure to confirm on apps like iMessage & FaceTime too.
After step 4, you will be all set. However, we strongly advise that you restart your phone after the switch. It helps all the systems catch up.
Common issues
Switching to a new Apple account can sometimes hit a few bumps — it happens, don’t sweat it. Here are a couple of common headaches people run into and ways to fix them fast:
- Your Apple ID isn’t getting recognized? Double-check your email and password. Sometimes it’s just a tiny typo messing things up.
- Can’t find a verification code? Make sure you can actually get into the email you used for iCloud. If you’re locked out there, you won’t get the code.
Take control of your iPhone by changing your Apple ID today
Changing your older Apple ID on an iPhone is easy and fast. In a way, it also improves your device’s security and gives you a cleaner digital life. And before you do it, just remember to back up any essential data.
So, go ahead, make the switch and enjoy your iPhone the way you want.
Tip: Don’t switch too often. If you change your Apple ID frequently, it can lead to sync issues. It’s advisable to settle on one stable account.